To oil an electric shaver, apply one to two drops of a lightweight mineral or sewing machine oil directly onto the shaving foil or rotary blade heads while the shaver is running, allow it to spread across the cutting surface for 10 to 15 seconds, then turn the shaver off and wipe away any excess with a clean cloth. The entire process takes under two minutes and should be done after every cleaning session — or at minimum once per week for daily shavers.
Lubrication is the single most important maintenance habit for extending the life of an electric shaver. According to the Society of Tribologists and Lubrication Engineers (STLE), metal-on-metal cutting components operating without adequate lubrication can experience wear rates up to 100 times higher than the same components operating with a thin film of oil between their surfaces. In an electric shaver, the cutting blade oscillates or rotates against the inner surface of the foil or guard at speeds ranging from 6,000 to 14,000 cycles per minute — making proper lubrication not a cosmetic nicety but a mechanical necessity for long-term performance.
Most shaver owners who experience reduced cutting performance, increased skin irritation, or a shaver that feels "draggy" on the skin attribute the problem to dull blades — when in the majority of cases, the blades are simply dry and under-lubricated. A properly oiled shaver that has been in service for 12 months will frequently outperform a brand-new, unoiled shaver fresh from the box.
This guide covers everything you need to know about oiling an electric shaver correctly: which oils are safe, which are dangerous, the step-by-step procedure for both foil and rotary models, how often to oil, common mistakes to avoid, and answers to the questions shaver owners ask most frequently.
What Oil to Use on an Electric Shaver: Safe Choices and What to Avoid
The correct oil for an electric shaver is a thin, food-grade or pharmaceutical-grade mineral oil — specifically a light lubricating oil in the ISO VG 10 to ISO VG 32 viscosity range. The most widely available and cost-effective option for most users is standard sewing machine oil, which falls in this exact range and is widely available in hardware stores for $3–$8 per bottle.
Recommended Oil Types
- Sewing machine oil (white mineral oil, ISO VG 10–15): The gold standard for electric shaver lubrication. Thin viscosity spreads easily across cutting surfaces, non-toxic on skin contact, odorless, colorless, and does not gum or leave residue. Widely available and inexpensive.
- Dedicated shaver/clipper oil: Many shaver manufacturers sell proprietary lubricating oils specifically formulated for their blades. These are typically equivalent to a light mineral oil with a proprietary additive package. They are safe and effective but generally more expensive per unit volume than generic sewing machine oil.
- Food-grade mineral oil (USP grade): Completely safe for skin contact, used in food processing equipment, and widely available in pharmacies as a laxative oil (internally safe means externally safe). Suitable for shaver lubrication when sewing machine oil is not available.
- Baby oil (unscented mineral oil): A practical substitute in the absence of purpose-made shaver oil. Baby oil is typically a light mineral oil with a fragrance additive — choose unscented versions to avoid unnecessary fragrance contact with facial skin. Slightly higher viscosity than sewing machine oil but acceptable for occasional use.
- Clipper oil: Essentially identical to sewing machine oil in formulation and viscosity range. Widely sold at barbering supply stores. Interchangeable with sewing machine oil for shaver lubrication purposes.
Oils to Avoid: What Will Damage Your Shaver
| Oil Type | Why It Is Unsuitable | Potential Damage |
| WD-40 | Solvent-based; not a lubricant; evaporates rapidly and leaves a residue that attracts contaminants | Increases wear after solvent evaporates; dissolves plastic housing components |
| Olive oil / cooking oils | Organic triglyceride oils oxidize and go rancid; attract bacteria and fungal growth | Sticky residue; hygiene risk; gums up cutting mechanism |
| Motor oil / engine oil | Too viscous; contains additives not safe for skin contact; clogs foil perforations | Reduced blade speed; skin irritation; foil blockage |
| Petroleum jelly (Vaseline) | Semi-solid grease; far too thick for shaver blade gaps; does not spread at operating temperatures | Blocks foil perforations; drastically reduces cutting efficiency |
| 3-in-1 oil (general purpose) | Higher viscosity than ideal; contains additives that may irritate facial skin | Possible skin sensitization; leaves heavier residue than light mineral oil |
Table 1: Oil types to avoid for electric shaver lubrication, with reasons for unsuitability and potential damage to shaver components or skin
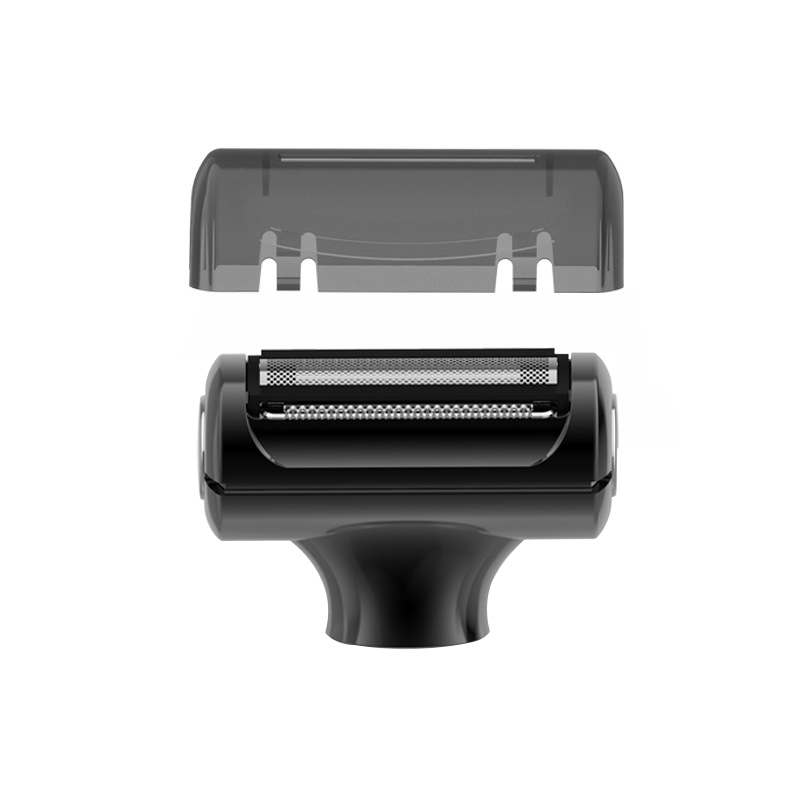
How to Oil a Foil Electric Shaver: Step-by-Step
Oiling a foil shaver takes approximately 90 seconds and follows a consistent process regardless of whether the shaver has one, two, or three foil segments. The objective is to deliver a thin film of oil between the inner cutter blade and the inner surface of the foil — the high-speed contact zone where wear occurs.
Preparation: Clean First, Then Oil
Always clean the shaver before oiling — applying oil over hair, skin debris, or old dried oil creates a paste that clogs the foil perforations and actually increases wear rather than reducing it. Quick cleaning before oiling takes 30 seconds and is not optional.
- Tap the shaver head gently over a sink or waste bin to dislodge loose hair clippings. Do not tap hard — this can distort the foil.
- Use the cleaning brush (supplied with most shavers) to brush remaining hair from the foil surface and the gap between the foil frame and the shaver body. Brush in short strokes along the length of the foil, not across it — brushing across the foil can damage the thin metal mesh.
- For wet-clean shavers: Rinse briefly under warm running water and allow to dry completely before applying oil. Applying oil to wet metal does not prevent it from working, but it dilutes the oil film and reduces its effectiveness on initial application.
The Oiling Procedure for Foil Shavers
- Do not remove the foil head or open the shaver. For routine lubrication, the oil is applied externally through the foil perforations — there is no need to disassemble the head. The shaver's operating vibration distributes the oil between the foil and the inner cutter automatically.
- Hold the shaver with the foil facing upward. This orientation prevents oil from running off the foil surface before it can be drawn into the cutting mechanism.
- Apply one to two drops of oil to the foil surface. Place the drops at the center of the foil, or distribute one drop per foil segment on multi-foil shavers. Do not apply more than two drops in total — excess oil does not improve lubrication and simply runs off the shaver onto your hands or skin during the next shave.
- Turn the shaver on and allow it to run for 15 to 20 seconds. The high-frequency oscillation of the inner cutter draws the oil through the foil perforations and distributes it across the full contact surface between blade and foil. You will often see the oil spread visibly across the foil during this step.
- Turn the shaver off and wipe the foil surface with a clean, dry cloth or paper towel to remove any oil that has remained on the outer foil surface. Oil on the outer foil surface will be transferred to your face during shaving — not harmful, but unnecessary and cosmetically unpleasant.
- Store the shaver with the protective cap on. This prevents dust and debris from settling on the freshly oiled foil surface between uses.
How to Oil a Rotary Electric Shaver: Step-by-Step
Oiling a rotary shaver uses the same principle as a foil shaver — oil applied to the guard head is drawn into the blade mechanism by the shaver's operating vibration — but the geometry of rotary heads requires a slightly different application technique for complete coverage of all three (or more) cutting heads.
Clean the Rotary Heads Before Oiling
Rotary shaver heads accumulate hair clippings between the individual cutter discs and within the circular guard channels. Before oiling:
- Remove the head cover/guard by pressing the release button — this exposes all three or four individual rotary cutting units.
- Rinse under warm running water (on waterproof models) or brush each cutter unit thoroughly with the cleaning brush. Do not remove the individual cutter discs during routine cleaning — doing so on rotary shavers disrupts the "run-in" fit between matched blade and guard sets and can reduce cutting performance.
- Allow to dry or shake off excess water before oiling.
The Oiling Procedure for Rotary Shavers
- With the head cover/guard removed, hold the shaver so the three cutter discs face upward.
- Apply one small drop of oil to the center slot or gap of each individual rotary cutter disc. Three-headed rotary shavers require three separate drops — one per head — for complete coverage. Do not apply oil to the plastic frame between heads; apply directly to each cutter.
- Replace the head cover over the oiled cutters.
- Turn the shaver on and run for 20 to 30 seconds. The longer run time (compared to foil shavers) ensures the oil is distributed through the circular cutting path of the rotary blade. The shaver's vibration and the rotation of the cutter discs spreads the oil through the full gap between cutter and guard.
- Turn off and wipe the exterior of the head with a clean cloth to remove any oil that has migrated to the outer guard surface.
How Often Should You Oil an Electric Shaver?
The correct oiling frequency for an electric shaver depends on how often it is used and whether a self-cleaning station is part of the routine — but for most daily shavers, once per week is the minimum effective frequency, with once after every cleaning session being the ideal standard.
| Usage Pattern | Recommended Oiling Frequency | Reason |
| Daily shaving (7 days/week) | After every wash / minimum once per week | High cycle count depletes oil film rapidly; washing removes residual oil |
| Every 2–3 days | Once per week | Lower cycle count but still requires consistent lubrication film maintenance |
| Weekly / occasional use | Before each use | Long storage intervals allow oil to evaporate; pre-use oiling ensures fresh film |
| Shaver with self-cleaning station | Every 2–4 weeks (supplement station cleaning) | Station cartridges contain lubricant but manual oiling provides additional film at blade tips |
| After blade/foil replacement | Immediately after fitting new components | New metal surfaces have microscopic roughness — immediate oiling protects during run-in period |
Table 2: Recommended oiling frequency for electric shavers by usage pattern, with rationale for each schedule
Research published in the journal Wear (Elsevier, 2018) on metal-to-metal cutting tool lubrication found that the critical transition from boundary lubrication to full-film lubrication — where wear drops dramatically — occurs when the oil film thickness between moving surfaces reaches approximately 0.1 to 1.0 micrometers. For shaver blades oscillating at 14,000 cycles per minute, maintaining this film requires fresh oil application at least weekly for daily users. An unlubricated shaver running for just 30 minutes of cumulative shaving time can accumulate measurable surface wear that, over months, noticeably degrades the shave quality.
Foil Shaver vs. Rotary Shaver: Does Oiling Make the Same Difference?
Both foil and rotary shavers benefit substantially from regular oiling, but the wear mechanisms differ between the two types, which affects where the benefit is most pronounced.
| Factor | Foil Shaver | Rotary Shaver |
| Blade motion type | Linear reciprocating (side-to-side) | Rotational (circular) |
| Operating speed | 8,000–14,000 strokes/min | 6,000–12,000 RPM |
| Primary wear zone | Inner cutter edges against foil inner surface | Cutter disc outer edge against guard inner ring |
| Foil/guard replacement interval (without oiling) | 6–9 months typical | 6–12 months typical |
| Foil/guard replacement interval (with weekly oiling) | 12–18 months typical | 12–24 months typical |
| Oil application method | 1–2 drops onto foil surface (shaver running) | 1 drop per cutter disc (head cover removed, shaver running) |
| Oiling difficulty | Very easy — oil through foil | Slightly more involved — remove cover, oil each disc |
Table 3: Comparison of foil and rotary electric shaver characteristics, oiling requirements, and benefit of regular lubrication on component service life
What Happens If You Never Oil Your Electric Shaver?
An electric shaver that is never oiled progresses through a predictable sequence of performance decline — from subtle reductions in shave comfort to complete failure of the cutting mechanism — over a timeline that varies by model, usage frequency, and whether cleaning is performed.
- Stage 1 (0–4 weeks without oiling): Imperceptible change. Factory lubrication from the manufacturing process sustains adequate blade performance initially. Most users notice nothing in this stage.
- Stage 2 (1–3 months without oiling): Increased drag on skin. The shaver requires more passes over the same area. Some users experience mild skin irritation, particularly on the neck, where the blade drags slightly rather than gliding. Many people incorrectly attribute this to growing out their beard or changing shaving technique.
- Stage 3 (3–6 months without oiling): Audible change in motor sound. The increased friction load on the cutting mechanism causes the motor to work harder — producing a slightly louder, higher-pitched sound during use. Blade temperature after shaving is perceptibly higher than when new. Skin redness after shaving increases.
- Stage 4 (6–12 months without oiling): Significant performance degradation. Shave quality noticeably declines. Hair is pulled rather than cut on many strokes. Multiple passes are needed for areas that previously cleared in one. Users typically replace the shaver at this stage, attributing the failure to blade wear — when lubrication alone would have prevented it.
- Stage 5 (12+ months without oiling): Mechanical failure. In the most extreme cases, the dry friction between blade and foil causes micro-welding of the contact surfaces, seizing the cutting mechanism entirely. The shaver motor overheats and the thermal protection trips, or the motor windings burn out entirely.
The irony is that the cost of the oil that would have prevented stages 2 through 5 is trivial. A 30 ml bottle of sewing machine oil costs approximately $5 and contains enough oil for 300 or more individual shaver oiling sessions — providing years of lubrication for less than the cost of a single replacement foil and blade set.
Common Oiling Mistakes and How to Avoid Them
Even users who oil their shavers regularly make several consistent errors that reduce the benefit of lubrication or actively cause harm to the shaver or skin.
- Applying too much oil: More than two drops per session does not improve lubrication — the oil film that protects the blade contact surface is measured in microns, and excess oil simply runs off the shaver and transfers to the face during the next shave. If you consistently see oil dripping from the shaver after application, you are using too much.
- Oiling without cleaning first: Applying oil to a shaver that has not been cleaned first locks hair debris and skin cells into a paste between the blade and foil. This paste is more abrasive than no oil at all. Clean first — always.
- Oiling a stationary shaver: Applying oil to a shaver that is turned off and then immediately using it without running the shaver first means the oil sits on the foil surface rather than penetrating between blade and foil. Always run the shaver for at least 15 seconds after oiling to distribute the oil correctly.
- Using thick or fragrant oils: Even if the oil is food-safe, using fragrant oils (scented baby oil, perfume-based products) introduces fragrance compounds to facial skin during every subsequent shave — a cumulative exposure that can cause contact sensitization in some individuals. Use unscented oils only.
- Disassembling rotary heads to oil between individual components: Removing the individual cutter discs from rotary shavers during routine maintenance is unnecessary and counterproductive. The matched pair between a cutter disc and its guard has been ground to a specific fit during manufacturing — reassembling them in a different combination reduces cutting sharpness. Leave rotary cutter discs in place during routine oiling.
- Forgetting to replace the protective cap: Leaving a freshly oiled shaver uncapped allows dust, skin flakes, and airborne particles to adhere to the oil film on the foil. The protective cap is not optional — it is part of the maintenance routine.
Frequently Asked Questions: How to Oil an Electric Shaver
Can I use coconut oil to lubricate my electric shaver?
No — coconut oil is an organic triglyceride that oxidizes rapidly at room temperature, produces a rancid smell within days of application, and provides ideal conditions for bacterial and fungal growth on the shaver surface. It is also solid below 24°C (76°F), meaning it will not spread correctly across the cutting surfaces in a cool environment. Stick to light mineral oil — sewing machine oil, clipper oil, or food-grade mineral oil — for safe, effective shaver lubrication.
Does my self-cleaning station oil the shaver for me?
Self-cleaning station cartridges contain a cleaning fluid that typically includes a small amount of lubricant — but the concentration of lubricant in these solutions is designed for maintenance between manual oiling sessions, not as a replacement for direct oiling. Independent testing of self-cleaning station cartridges by shaving equipment reviewers has consistently found that blades lasted longer when supplemental manual oiling was combined with regular station cleaning versus station cleaning alone. If you use a self-cleaning station, manually oil your shaver every two to four weeks in addition to the station cleaning routine.
Will oiling my shaver help if it already shaves poorly?
It depends on how far the performance has degraded. If the poor shave quality is due to dry cutting surfaces — which is the most common cause of declining performance — oiling will produce a noticeable improvement within one to two shaving sessions. However, if the blades or foil have developed permanent wear or micro-damage from prolonged dry operation, oiling will improve comfort but will not restore the original sharpness of the cutting edge. Lubrication prevents wear; it does not reverse it. If oiling does not improve performance within a week of regular use, the blades and foil likely need replacement.
Is it safe to shave immediately after oiling the shaver?
Yes — the ideal oiling protocol is to oil, run the shaver briefly to distribute the oil, wipe the external foil surface, and then shave. The trace amount of food-grade or mineral oil that may remain on the foil surface after wiping is completely safe for skin contact. Food-grade mineral oil is used as a topical skin treatment in dermatology, classified by the FDA as Generally Recognized As Safe (GRAS), and is non-comedogenic. There is no need to delay shaving after oiling, provided you wipe away any visible excess oil from the shaver head surface before pressing it to your face.
How do I know if my shaver needs oiling?
The most reliable indicator that an electric shaver needs oiling is a change in shave feel — specifically, a sensation of dragging, pulling, or increased friction on the skin compared to when the shaver was recently oiled or new. Auditory cues also help: a shaver running at a slightly higher pitch or with a more labored motor sound than usual is working harder because of blade friction. Finally, if the shaver head is noticeably warm to the touch after a routine shaving session, the cutting surfaces are generating more heat through friction than they should — a clear signal that lubrication is needed.
Can oiling replace foil and blade replacement?
No — oiling extends the service life of foils and blades significantly but does not eliminate the need for eventual replacement. Over time, the cutting edges of the inner blades dull through accumulated micro-wear, and the foil develops microscopic perforations or thinning from repeated stress cycles. No amount of lubrication restores a mechanically dulled edge. Most shaver manufacturers recommend replacing foil and blade sets every 12 to 18 months for daily users — a schedule that assumes consistent oiling. Without regular oiling, the replacement interval shortens to 6–9 months for many users. Think of oiling and blade replacement as complementary maintenance practices, not alternatives to each other.
Oiling an electric shaver is the simplest, least expensive, and most effective maintenance habit a shaver owner can adopt — requiring two drops of oil, 90 seconds of effort, and a once-per-week commitment that collectively doubles the service life of the most expensive consumable components in the device. The physics are uncomplicated: thin-film lubrication between metal-on-metal cutting surfaces reduces wear dramatically, protects blade sharpness, reduces motor load, and preserves the comfort of the shave on skin.
Whether your shaver uses foil or rotary technology, the investment of time and the cost of oil are trivially small compared to the cost of early foil replacement, blade replacement, or shaver replacement that neglect makes inevitable. Oil it, clean it, protect it — and a quality electric shaver will repay that minimal care with years of reliable performance.